Introduction#
I’m writing this while on a train to Zurich, on the train’s public Wi-Fi — IPv4-only. And I’m still connected to all my home services via VPN, even though my home sits behind a DS-Lite connection with no public IPv4. My other article covers setting up OPNsense with DS-Lite.
The solution: a VPS with dual-stack public IPs acting as a WireGuard hub. My home router connects to the VPS over IPv6, and I connect from anywhere using the VPS’s public IPv4. I needed this mainly for work — our office network is IPv4-only and I wanted access to my self-hosted LLM server at home. I discussed it with Claude, which suggested a site-to-site WireGuard tunnel between home and VPS over IPv6, with road warriors connecting to the VPS over IPv4.
Overview#
The result: I can reach any home address from an IPv4-only network — including VLANs that are IPv6-only. It’s been solid since I set it up.
The VPS is the hub:
[Home LAN 10.56.0.0/20 + fde4:ed21:b2c0:5600::/56]     [Road Warrior]
        |                                                       |
  [OPNsense Firewall]                                  WireGuard client
   WireGuard peer                                       10.0.0.3/24
   10.0.0.2/24                                    fde4:ed21:b2c0:56dd::3/64
   fde4:ed21:b2c0:56dd::2/64                               |
        |                                                   |
        └──── IPv6 tunnel ──────[VPS]────── IPv4 tunnel ───┘
                          10.0.0.1/24
                    fde4:ed21:b2c0:56dd::1/64
                         WireGuard Hub
Network plan#
| Role | Device | WireGuard IPv4 | WireGuard IPv6 (ULA) | Public Endpoint |
|---|---|---|---|---|
| Hub | VPS | 10.0.0.1/24 | fde4:ed21:b2c0:56dd::1/64 | VPS_PUBLIC_IPv4 (static IPv4) / VPS_PUBLIC_IPv6 (static IPv6) |
| Home gateway | OPNsense | 10.0.0.2/24 | fde4:ed21:b2c0:56dd::2/64 | vpn.petarcubela.de (dynamic IPv6 via DDNS) |
| Road warrior | Laptop/PC | 10.0.0.3/24 | fde4:ed21:b2c0:56dd::3/64 | CLIENT_PUBLIC_IPv4 (IPv4) |
- Home LAN IPv4 subnet:
10.56.0.0/20(covers all home VLANs) - Home LAN IPv6 ULA block:
fde4:ed21:b2c0:5600::/56(covers all home VLANs) - WireGuard tunnel IPv4 subnet:
10.0.0.0/24 - WireGuard tunnel IPv6 subnet:
fde4:ed21:b2c0:56dd::/64 - WireGuard port:
51822/udp
Part 1 — VPS setup#
root user.1.1 Generate keys#
Generate a keypair using wg and store both files in the default WireGuard directory. The private key needs restricted permissions.
wg genkey | tee /etc/wireguard/vps_private.key | wg pubkey > /etc/wireguard/vps_public.key
chmod 600 /etc/wireguard/vps_private.key
1.2 Enable IP forwarding#
The VPS needs to forward packets between the tunnel and the internet, so IP forwarding must be enabled.
cat >> /etc/sysctl.conf << 'EOF'
net.ipv4.ip_forward=1
net.ipv6.conf.all.forwarding=1
EOF
sysctl -p
1.3 WireGuard config /etc/wireguard/wg0.conf#
The PostUp hooks run after the interface comes up and do two things: open the kernel firewall to allow forwarded traffic (FORWARD rules), and enable NAT for outbound IPv4 via the physical interface (MASQUERADE on eth0). The PreDown hooks undo this cleanly before the interface goes down. Both the FORWARD rules and the sysctl settings from §1.2 are required: sysctl enables IP forwarding at the kernel level, but the firewall (ufw sets the forward policy to DROP by default) still blocks forwarded packets until the FORWARD chain is explicitly opened.
There is no IPv6 MASQUERADE rule because this setup uses ULA addresses (fd...) — they route only within the WireGuard tunnel and never leave the VPS to the internet.
Before saving this config, check your internet-facing interface name with ip -br link and replace eth0 if it differs (common alternatives: ens3, ens18, venet0).
[Interface]
Address    = 10.0.0.1/24, fde4:ed21:b2c0:56dd::1/64
ListenPort = 51822
PrivateKey = <vps-private-key>
# MTU = 1360   # uncomment if large transfers stall

# Replace eth0 with your actual internet-facing interface
PostUp   = iptables -A FORWARD -i wg0 -j ACCEPT
PostUp   = iptables -A FORWARD -o wg0 -j ACCEPT
PostUp   = iptables -t nat -A POSTROUTING -o eth0 -j MASQUERADE
PostUp   = ip6tables -A FORWARD -i wg0 -j ACCEPT
PostUp   = ip6tables -A FORWARD -o wg0 -j ACCEPT
PreDown  = iptables -D FORWARD -i wg0 -j ACCEPT
PreDown  = iptables -D FORWARD -o wg0 -j ACCEPT
PreDown  = iptables -t nat -D POSTROUTING -o eth0 -j MASQUERADE
PreDown  = ip6tables -D FORWARD -i wg0 -j ACCEPT
PreDown  = ip6tables -D FORWARD -o wg0 -j ACCEPT

# ── Home (OPNsense) ───────────────────────────────────────────
[Peer]
PublicKey  = <opnsense-public-key>
# No Endpoint — OPNsense initiates, VPS learns the address dynamically
# AllowedIPs: tunnel IPs + entire home IPv4 LAN + entire home ULA /56 block
AllowedIPs = 10.0.0.2/32, fde4:ed21:b2c0:56dd::2/128, 10.56.0.0/20, fde4:ed21:b2c0:5600::/56

# ── Road warrior / client ─────────────────────────────────────
[Peer]
PublicKey  = <client-public-key>
AllowedIPs = 10.0.0.3/32, fde4:ed21:b2c0:56dd::3/128
# No Endpoint needed — client initiates the connection
Notice that OPNsense appears here as just another WireGuard peer. What makes this a site-to-site tunnel — rather than a plain client VPN — is the AllowedIPs for the OPNsense peer: by including the full home LAN subnets (10.56.0.0/20 and fde4:ed21:b2c0:5600::/56), the VPS builds routing table entries for those entire prefixes pointing at OPNsense. In WireGuard, AllowedIPs acts as both a route and an ACL: packets destined for those subnets are sent to OPNsense, and only packets sourced from those subnets are accepted from OPNsense.
1.4 Enable and start#
Enable the tunnel:
systemctl enable --now wg-quick@wg0
wg show   # verify interface and peers
1.5 UFW firewall#
I use ufw on my VPS. First, allow the WireGuard port:
ufw allow 51822/udp comment "WireGuard"If UFW is not already active, ensure port 22/TCP is allowed before running ufw enable to avoid locking yourself out of SSH.
Next, packet forwarding must also be permitted by UFW. Edit /etc/default/ufw and change the forward policy:
DEFAULT_FORWARD_POLICY="ACCEPT"Then reload UFW to apply:
ufw reloadPart 2 — OPNsense (home gateway)#
All steps are performed in the OPNsense web UI.
2.1 Create WireGuard instance#
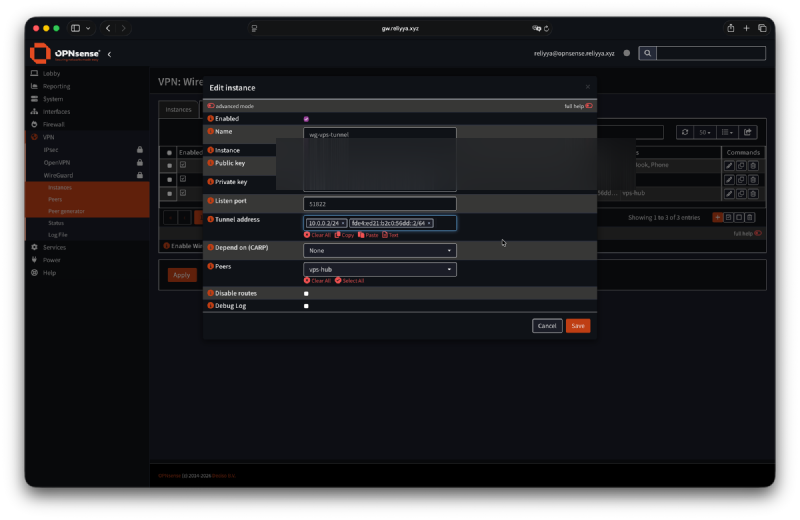
VPN → WireGuard → Instances → Add
| Field | Value |
|---|---|
| Name | wg-vps-tunnel |
| Listen Port | 51822 |
| Tunnel Address | 10.0.0.2/24, fde4:ed21:b2c0:56dd::2/64 |
| Generate keypair | copy the public key for use on the VPS |
2.2 Add VPS as a peer#
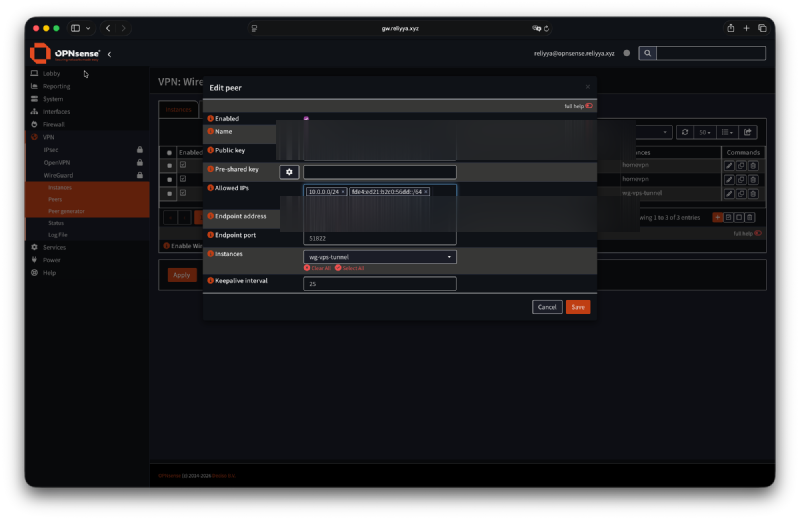
VPN → WireGuard → Peers → Add
| Field | Value |
|---|---|
| Name | vps-hub |
| Public Key | <vps-public-key> |
| Endpoint Address | VPS_PUBLIC_IPv6 |
| Endpoint Port | 51822 |
| Allowed IPs | 10.0.0.0/24, fde4:ed21:b2c0:56dd::/64 |
| Keepalive | 25 |
Use the VPS IPv6 address as the endpoint — the home→VPS leg travels over IPv6 since home has no public IPv4.
The
Keepaliveof 25 seconds is necessary because OPNsense sits behind the DS-Lite CGNAT. WireGuard is completely silent when idle, and NAT state tables typically expire UDP mappings after 25–30 seconds of inactivity. A keepalive packet every 25 seconds keeps the mapping alive and ensures OPNsense can always receive incoming packets from the VPS.
2.3 Assign the WireGuard interface#
Interfaces → Assignments → assign the new wg interface, enable it.
2.4 Add gateway#
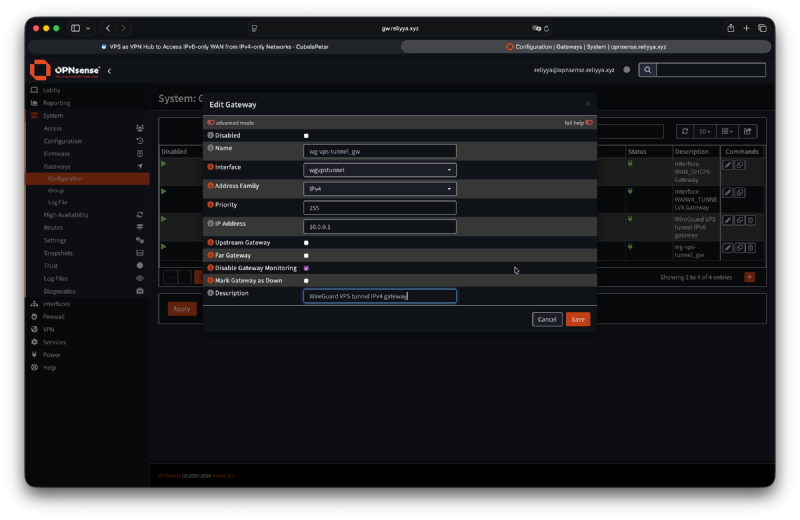
System → Gateways → Configuration → Add
| Field | Value |
|---|---|
| Name | wg-vps-tunnel_gw |
| Interface | wgvpstunnel |
| Address Family | IPv4 |
| IP Address | 10.0.0.1 |
| Disable Gateway Monitoring | ✅ |
| Description | WireGuard VPS tunnel IPv4 gateway |
OPNsense does not automatically create a connected route for WireGuard interfaces (unlike Linux). You must add the gateway object manually.
2.5 Add static route#
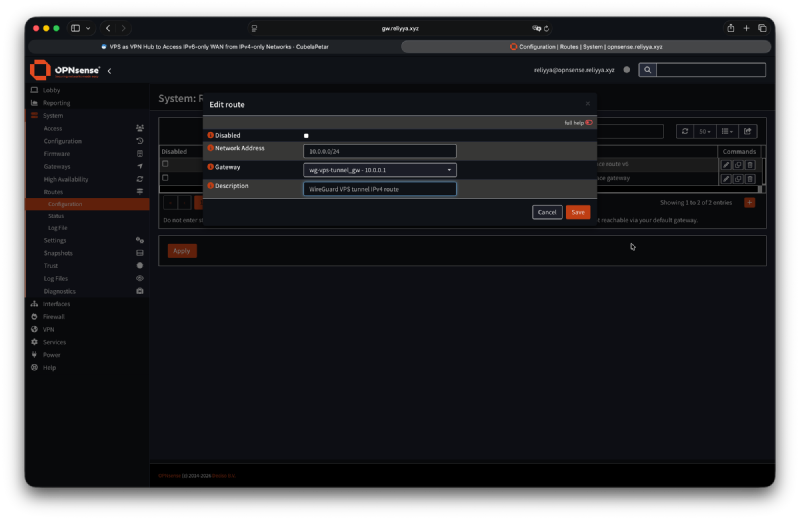
System → Routes → Configuration → Add
| Field | Value |
|---|---|
| Network Address | 10.0.0.0/24 |
| Gateway | wg-vps-tunnel_gw - 10.0.0.1 |
| Description | WireGuard VPS tunnel IPv4 route |
This route is required. Without it OPNsense does not know to send return traffic for
10.0.0.0/24back into the tunnel.
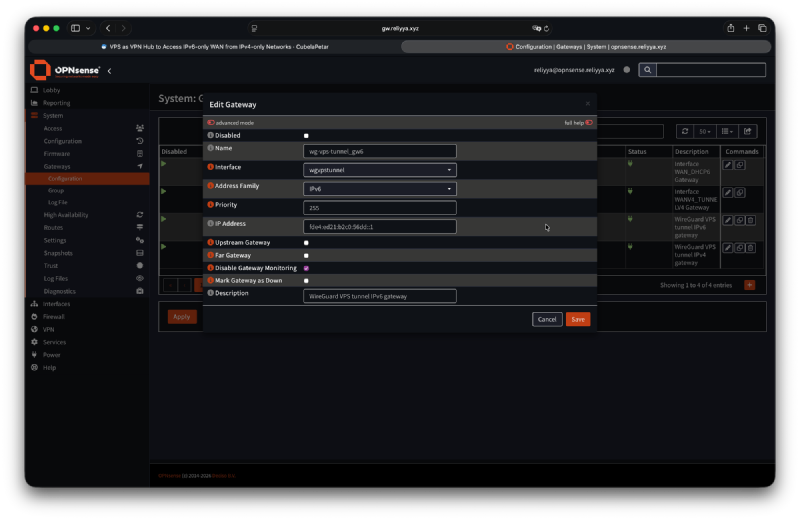
2.6 Add IPv6 gateway#
System → Gateways → Configuration → Add
| Field | Value |
|---|---|
| Name | wg-vps-tunnel_gw6 |
| Interface | wgvpstunnel |
| Address Family | IPv6 |
| IP Address | fde4:ed21:b2c0:56dd::1 |
| Disable Gateway Monitoring | ✅ |
| Description | WireGuard VPS tunnel IPv6 gateway |
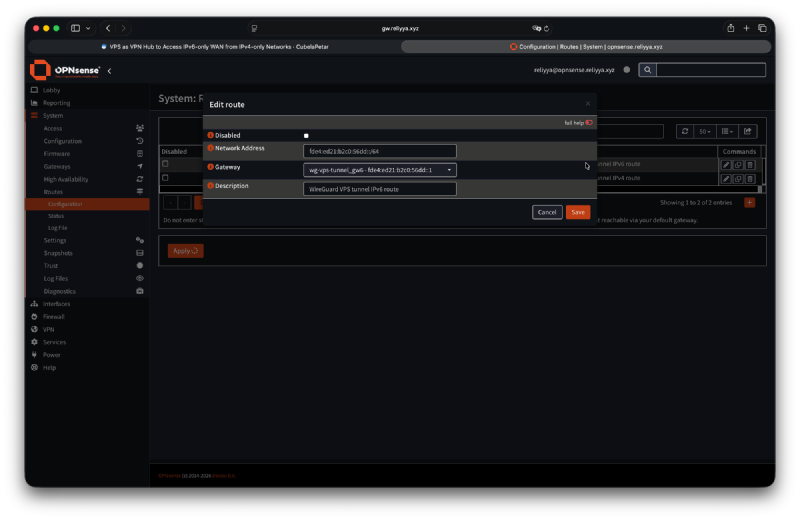
2.7 Add IPv6 static route#
System → Routes → Configuration → Add
| Field | Value |
|---|---|
| Network Address | fde4:ed21:b2c0:56dd::/64 |
| Gateway | wg-vps-tunnel_gw6 - fde4:ed21:b2c0:56dd::1 |
| Description | WireGuard VPS tunnel IPv6 route |
2.8 Firewall rules#
Firewall → Rules → [wgvpstunnel interface] → Add (IPv4 — allow tunnel subnet)
| Field | Value |
|---|---|
| Action | Pass |
| TCP/IP Version | IPv4 |
| Source | 10.0.0.0/24 |
| Destination | 10.0.0.0/24 |
OPNsense blocks all traffic on new interfaces by default, so even with the tunnel established no packets will flow until a pass rule is in place. Without this rule, a ping 10.0.0.2 from the VPS will fail, making it impossible to verify tunnel connectivity. The rule allows any host in the tunnel subnet to reach any other host in the same subnet — including OPNsense’s own tunnel address 10.0.0.2.
Firewall → Rules → [wgvpstunnel interface] → Add (IPv4 — allow access to home LAN)
| Field | Value |
|---|---|
| Action | Pass |
| TCP/IP Version | IPv4 |
| Source | 10.0.0.0/24 |
| Destination | 10.56.0.0/20 |
Firewall → Rules → [wgvpstunnel interface] → Add (IPv6 — allow access to home ULA)
| Field | Value |
|---|---|
| Action | Pass |
| TCP/IP Version | IPv6 |
| Source | fde4:ed21:b2c0:56dd::/64 |
| Destination | fde4:ed21:b2c0:5600::/56 |
Firewall → Rules → LAN → Add
| Field | Value |
|---|---|
| Action | Pass |
| TCP/IP Version | IPv4+IPv6 |
| Source | 10.56.0.0/20 / fde4:ed21:b2c0:5600::/56 |
| Destination | 10.0.0.0/24 / fde4:ed21:b2c0:56dd::/64 |
Part 3 — Road warrior / client#
3.1 Generate keys#
Linux/macOS:
wg genkey | tee client_private.key | wg pubkey > client_public.keyWindows: Use the official WireGuard GUI — it generates the keypair automatically.
3.2 WireGuard config client.conf#
[Interface]
Address    = 10.0.0.3/24, fde4:ed21:b2c0:56dd::3/64
PrivateKey = <client-private-key>
# DNS: OPNsense MGMT interface (IPv4 + IPv6)
DNS        = 10.56.0.1, fde4:ed21:b2c0:5600::254
# MTU = 1360   # uncomment if large transfers stall

[Peer]
PublicKey           = <vps-public-key>
Endpoint            = VPS_PUBLIC_IPv4:51822   # VPS IPv4 address
AllowedIPs          = 10.0.0.0/24, 10.56.0.0/20, fde4:ed21:b2c0:56dd::/64, fde4:ed21:b2c0:5600::/56
PersistentKeepalive = 25
AllowedIPs routes tunnel traffic, the entire home IPv4 LAN, the tunnel IPv6 subnet, and the entire home ULA /56 block through the VPS. Internet traffic remains local on the client (split tunnel).
fde4:ed21:b2c0:56dd::/64 falls within fde4:ed21:b2c0:5600::/56 — the /56 covers 5600:: through 56ff::, so 56dd is already included. You could drop the /64 entry and the /56 alone would cover it, but listing both makes the intent explicit: 56dd::/64 is the VPN tunnel subnet, 5600::/56 is the home LAN ULA block. WireGuard resolves the overlap via longest-prefix matching.
3.3 Add client peer to VPS#
Once you have the client’s public key, add it to the VPS:
# Add live without dropping existing connections
wg set wg0 peer <client-public-key> allowed-ips 10.0.0.3/32,fde4:ed21:b2c0:56dd::3/128

# Persist to config
wg-quick save wg0Verification#
On the VPS#
# Check tunnel status and peer handshakes
wg show

# Healthy output shows recent handshake and data transfer:
# peer: <opnsense-pubkey>
#   latest handshake: 14 seconds ago
#   transfer: 1.23 MiB received, 456 KiB sent

# Ping OPNsense tunnel IPs
ping 10.0.0.2
ping6 fde4:ed21:b2c0:56dd::2

# Ping a home LAN device (IPv4 + IPv6 ULA)
ping 10.56.0.1
ping6 fde4:ed21:b2c0:5600::254

# Ping client tunnel IPs (once client peer is connected)
ping 10.0.0.3
ping6 fde4:ed21:b2c0:56dd::3
From road warrior / client#
# Ping VPS tunnel IPs
ping 10.0.0.1
ping6 fde4:ed21:b2c0:56dd::1

# Ping OPNsense tunnel IPs
ping 10.0.0.2
ping6 fde4:ed21:b2c0:56dd::2

# Ping a home LAN device by IPv4
ping 10.56.0.1

# Ping a home device that only has a ULA IPv6 address
ping6 fde4:ed21:b2c0:5601::<address>   # e.g. a device on the server VLAN
Packet-level debugging (on VPS)#
# Watch ICMP traffic on the tunnel interface
tcpdump -i wg0 icmp

# If you see echo request but no echo reply:
# → packet reaches the tunnel but OPNsense is dropping it (check firewall rules)
# If you see nothing:
# → packet never enters the tunnel (check AllowedIPs and routing)